
When planning an event, the goal is always to create an experience that guests will remember long after they leave. While traditional decor and lighting set a mood, they can feel static. If you’re looking for a true “wow” factor that captivates an audience, it’s time to consider projection mapping. This technology moves beyond simple backdrops, turning the very architecture of your venue into a dynamic canvas for storytelling. You can wrap a company’s logo around a column, make a stage set come to life with animation, or create an atmosphere that changes throughout the night, keeping your guests completely engaged and immersed in your brand’s world.
Key Takeaways
- Think Beyond the Screen: Projection mapping turns any object—from architecture to a centerpiece—into a dynamic canvas. Use this technology to craft a unique, immersive atmosphere that static decorations simply can’t match.
- Master the Technical Basics: A flawless projection requires more than a great idea. Pay close attention to your surface choice, control the ambient lighting, and match your content’s resolution to the projector to ensure a crisp and believable effect.
- Focus on the Experience, Not Just the Effect: The real value of projection mapping is its ability to create interactive and memorable brand experiences. View it as a strategic tool for audience engagement that offers a sustainable alternative to single-use physical sets.
What is Projection Mapping and How Does It Work?
Have you ever seen a building seem to crumble and rebuild itself, or a wedding cake covered in moving floral patterns? That’s the magic of projection mapping. At its core, projection mapping is a technique that uses specialized projectors to turn almost any object—no matter how irregular its shape—into a surface for video projection. Think of it as a step beyond a flat movie screen; it’s a way to create spatial augmented reality that makes static objects come alive with light, color, and motion.
The process starts by choosing a surface, which could be anything from a stage backdrop at a conference to the intricate architecture of a gala venue. From there, custom video content is created. The real trick is in the software, which “maps” the video to fit every angle, curve, and edge of the object perfectly. This precise alignment creates a seamless illusion, making it look as though the object itself is changing, moving, or telling a story. It’s a powerful tool for creating immersive environments and unforgettable moments at any event.
Breaking Down the Technology
So, how does a video perfectly wrap around a complex object without spilling onto the background? The secret is a technique called masking. Essentially, the software creates a digital stencil that tells the projector exactly where to shine the light and—just as importantly—where not to. This ensures the visuals appear only on the intended surfaces, creating a crisp and believable effect. This technology is incredibly versatile and can be scaled for almost any application. You can map a small product display at a trade show or use multiple high-powered projectors to cover an entire skyscraper, creating a massive public art installation.
The Essential Components for a Setup
While the final result can look incredibly complex, the basic setup for projection mapping relies on a few key components. First, you need a computer to run the mapping software and play the video content. Next is the star of the show: the video projector. The power of the projector, measured in lumens, is critical and depends on the size of your surface and the ambient lighting of the space. A small indoor project might only need a 5,000-lumen projector, while a large outdoor display requires a much more powerful one. Finally, you need the surface itself and the right software to bring your vision to life.
What Are the Different Types of Projection Mapping?
Projection mapping isn’t a one-size-fits-all technology. The type you choose depends entirely on your canvas—the surface you’re projecting onto—and the kind of experience you want to create for your guests. Think of it like choosing the right brush for a painting. A flat wall requires a different approach than a multi-tiered wedding cake or a historic building’s facade. Understanding the main categories will help you pinpoint the perfect way to bring your event’s theme to life, whether you’re aiming for subtle elegance or a show-stopping spectacle. Each type offers a unique way to tell a story and transform a physical space into something truly magical. Let’s look at the three primary forms of projection mapping you’ll encounter.
2D Projection Mapping
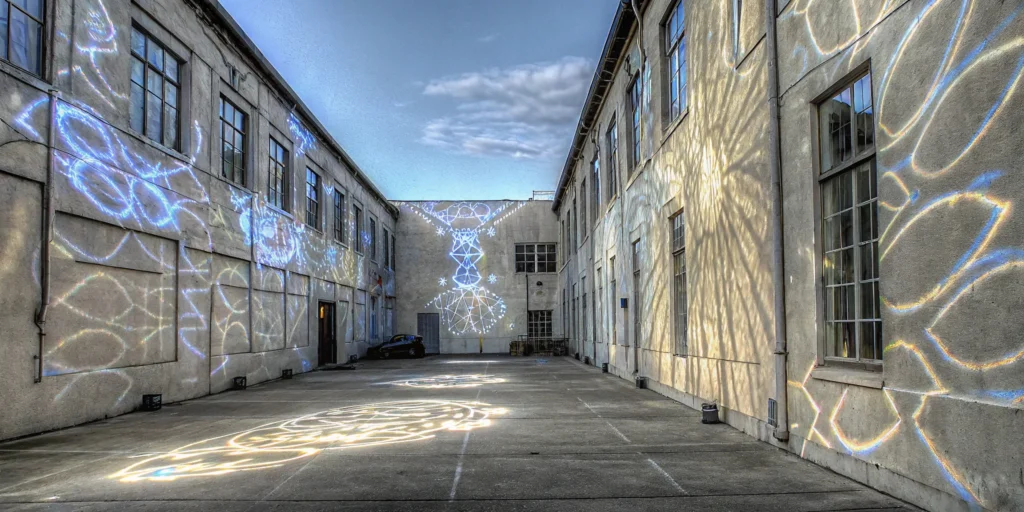
This is the most straightforward type of projection mapping, but don’t let that fool you—it can still create a huge impact. 2D mapping is designed for flat or slightly curved surfaces, like a wall, a screen, or a stage backdrop. It works by projecting video or images onto a two-dimensional plane to add movement, texture, and depth where there was none before. Imagine turning a plain white wall at a gala into a cascading waterfall or making a company logo appear to build itself piece by piece on a screen. It’s an excellent way to create visually stunning backdrops and art installations that can completely change the atmosphere of a room without complex structural changes.
3D Projection Mapping
Here’s where things get really exciting. 3D projection mapping is used on objects with depth and dimension, like buildings, cars, sculptures, or even elaborately designed cakes. This technique uses specialized software to “wrap” the projection around every corner, curve, and contour of the object. The result is a mind-bending illusion that can make a static object appear to move, change shape, or come to life. You could make a building’s windows light up in sequence, have patterns crawl across a car, or make a sculpture appear to breathe. It’s a powerful tool for creating an immersive experience that captivates an audience and becomes the centerpiece of any corporate event or large-scale celebration.
Interactive Projection Mapping
Interactive projection mapping takes the experience from passive viewing to active participation. This advanced technique allows the projected visuals to change and react in real-time based on an audience’s movements or actions. Imagine guests walking across a projected floor that sends ripples of light out with every step, or a wall where people can use hand gestures to “paint” with digital light. This form of audience engagement creates a deep, personal connection to the experience, making it incredibly memorable. It’s perfect for trade show booths, brand activations, and any event where you want guests to do more than just watch—you want them to play and interact with their environment.
What Equipment and Software Do You Need?
Getting started with projection mapping is more accessible than you might think. You don’t need a Hollywood-level budget to begin experimenting. The key is to match your gear to the scale of your vision. Whether you’re planning a small art installation or a massive display for a corporate gala, the right tools will bring your ideas to life. Let’s break down the essential hardware, software, and budgeting tips you’ll need.
Choosing the Right Hardware and Projector
At its core, a projection mapping setup requires just a few key pieces of hardware: a computer, a video projector, and a surface to project onto. You’ll also need the right cable to connect your computer to the projector. For larger projects, like transforming the stage at a conference or mapping an entire building, the projector’s power is crucial. You’ll want to look for high-powered projectors (20,000 lumens or more). For truly massive displays, professionals often use a technique called “edge blending,” where multiple projectors work together to create one bright, seamless image for your corporate events.
Popular Software for Your First Project
Once you have the hardware, you’ll need software to design and control your visuals. For those just starting, HeavyM is a fantastic choice because of its user-friendly interface. It’s compatible with both Mac and Windows and even has a library of ready-to-use visual effects to get you going quickly. Another industry favorite is Resolume, which offers a free demo version with all the features of the full program. This allows you to experiment and learn the ropes without any initial investment, making it a perfect way to see if projection mapping is the right fit for your creative toolkit.
How to Plan Your Budget
The cost of a projection mapping project can range from a few hundred dollars to tens of thousands, depending entirely on its complexity. While large-scale, jaw-dropping displays are typically handled by experienced audiovisual companies and creative agencies, you don’t have to break the bank to get started. The best approach is to begin with affordable tools and practice on smaller surfaces. This allows you to build your skills and understand the process firsthand. As your confidence and project ambitions grow, you can then decide whether to invest in more advanced equipment or partner with a professional team to execute a larger vision.
How Can You Use Projection Mapping?
Projection mapping is an incredibly versatile technology that goes far beyond simply projecting an image onto a flat screen. It’s about turning any surface—a building, a stage set, a car, or even a wedding cake—into a dynamic canvas for video and animation. This opens up a world of creative possibilities for telling stories, engaging audiences, and creating moments people won’t forget. Whether you’re planning a corporate conference or a massive public art display, projection mapping offers a unique way to make a powerful statement. Let’s look at some of the most impactful ways you can put this technology to work.
Transforming Events and Entertainment
This is where projection mapping truly shines. For corporate events, you can transform a simple ballroom into a branded universe, with logos and patterns swirling across the walls. At a gala or charity function, you can project stunning visuals onto the architecture of the venue, creating an atmosphere of elegance and wonder. The technology allows you to craft a unique and memorable experience for any occasion, from product launches to weddings. Instead of static decorations, you get a living, breathing environment that can change throughout the night, keeping guests captivated from the moment they arrive.
Creating Unforgettable Ads and Displays
Marketers are always looking for fresh ways to grab attention, and projection mapping delivers. You can turn everyday physical objects into mesmerizing works of art through digital effects and animations. Imagine launching a new sneaker by projecting dynamic graphics directly onto the shoe itself, highlighting its features in a way a simple photo never could. These kinds of brand activations are perfect for trade shows, retail displays, and pop-up shops. They stop people in their tracks and create shareable social media moments that extend your reach far beyond the physical event.
Designing Public Art and Exhibitions
Projection mapping has also become a powerful medium for artists and cultural institutions. Cities around the world use it to illuminate landmarks with historical narratives or vibrant artistic displays. It’s a popular choice for everything from live concerts and theater productions to museum exhibits. By projecting onto building facades or custom-built structures, you can create large-scale art that is accessible to everyone. This approach can transform a public space, draw crowds, and generate a significant buzz for a festival, a city celebration, or a new gallery opening.
Building Immersive Brand Experiences
Ultimately, all of these applications work toward one goal: creating a deeper connection between a brand and its audience. By turning ordinary spaces into extraordinary canvases, you can craft immersive brand experiences that truly resonate with people. You’re not just showing them an ad; you’re inviting them into a story. This technique allows you to control the entire visual environment and guide your audience through a carefully curated journey. It’s a powerful way to communicate your brand’s identity, values, and message in a way that feels authentic and leaves a lasting impression.
How to Create Your First Projection Mapping Project
Ready to bring your vision to life? Breaking down the process into manageable steps makes your first projection mapping project much less intimidating. Think of it as a four-part plan: dreaming up the idea, setting the stage, creating the visuals, and then testing it all out. Following this structure will help you stay organized and ensure your final display is as impressive as you imagined. Let’s walk through each step together.
Plan Your Concept and Storyboard
Before you touch any equipment, start with your story. What do you want your audience to feel or experience? Brainstorm your core idea and sketch it out on paper. Once you have a rough concept, you can create a digital storyboard or even a simple 3D model of your idea and the object you’ll be projecting onto. This planning phase is crucial because it acts as your blueprint. It helps you visualize the final product and ensures your animations will perfectly complement the surface, turning a simple projection into a cohesive and compelling narrative for your corporate event.
Prepare Your Workspace and Surface
Next, it’s time to set up your physical space. First, choose your canvas. This could be anything from a building facade or a car to a wedding cake or a custom-built stage set. The surface you pick will define the project’s character. Then, position your projector. The right placement depends on the size of your surface and the ambient light in the room. A larger surface or a brighter environment will require a more powerful projector. Take the time to get this right, as the projector’s angle and distance are key to a crisp, clear image that wows your guests.
Create and Align Your Content
This is where your storyboard comes to life. Using projection mapping software, you’ll design the animations and videos that will fit your chosen surface. Many programs, like HeavyM, offer ready-to-use effects that can simplify the process. You can also import your own videos and images. The main task here is to “mask” or map your content to the specific features of the object. This involves digitally tracing the object’s edges and contours so the projection aligns perfectly, making it look like the visuals are a natural part of the surface itself.
Test and Refine Your Projection
Once your content is created and your equipment is in place, it’s time for a full test run. Export your final video, making sure its resolution matches your projector’s native resolution for the best possible quality. Set everything up and run the projection from the exact angle your audience will be viewing it from. This step is non-negotiable—it’s where you’ll spot any alignment issues or technical glitches. Make small adjustments to the projector’s position or tweak your digital masks until the illusion is seamless. A thorough test ensures a flawless performance on event day.
Key Technical Details for a Flawless Projection
Getting the technical side of projection mapping right is what truly makes the magic happen. It’s the difference between a cool effect and a genuinely breathtaking experience that your guests will talk about for years. While the creative possibilities are endless, a flawless execution comes down to a few key details. Think of it like setting the stage for a show—every element, from the lighting to the backdrop, has to be perfect. Before you dive into creating stunning visuals, you need to nail the fundamentals of your setup. Paying attention to the surface, lighting, and image quality will ensure your projection is crisp, vibrant, and perfectly aligned with your vision, creating a seamless illusion that captivates everyone in the room. For any event, from a corporate gala to a private celebration, these technical points are the foundation of an unforgettable display.
Find the Perfect Surface
The first step is to choose your canvas. Unlike a traditional screen, projection mapping can turn almost any object into a dynamic display. You could project onto a building facade, a car, a stage set, or even a wedding cake. The key is to pick a surface that complements your design. Lighter-colored, non-reflective surfaces work best because they show off the colors and details of your projection without causing glare. The texture and shape of the object also play a huge role, as they become part of the visual story you’re telling. Think about how the unique architecture of your venue could become the star of the show.
Manage Lighting and Your Environment
Your biggest challenge will almost always be ambient light. For a projection to look its best, the surrounding environment needs to be as dark as possible. This allows the projected light to stand out, making colors appear rich and vibrant. For large-scale projects, like mapping an entire building, you’ll need extremely powerful projectors—sometimes 20,000 lumens or more. Often, professionals use a technique called “edge blending” to seamlessly stitch the images from multiple projectors together. Whether your event is indoors or outdoors, having full control over the lighting is essential for a stunning result.
Get the Right Resolution and Image Quality
Resolution is all about clarity. To avoid a blurry or pixelated image, the resolution of your video content must match the native resolution of your projector. It’s a simple rule that makes a world of difference. You’ll also want to consider the projector’s throw ratio, which determines how large the image will be from a specific distance. A short-throw projector can create a big image from just a few feet away, which is perfect for smaller venues or tight spaces. Ultimately, high-quality hardware is only half the battle; your projection will only ever be as good as the visual content you create for it.
Common Challenges to Prepare For
Projection mapping can completely transform a space, but it’s a good idea to go into the process with a clear understanding of the potential hurdles. Like any high-impact event feature, success comes from smart planning and anticipating the details. Thinking through the costs, technical skills, and physical setup ahead of time ensures your final projection is seamless and stunning, rather than a source of last-minute stress. When you know what to expect, you can allocate your resources effectively and focus on creating an unforgettable experience for your guests.
Understanding the Real Costs
The first question for many is about the budget, and it’s important to know that the costs go beyond just the projector. High-quality projection mapping is an investment in an experience. The final price tag includes the hardware rental, specialized software licenses, and—most importantly—the creation of the custom visual content. This is where the real magic happens; marketers can transform everyday objects into dynamic displays, but that requires skilled animators and designers. Staffing is another key cost, as you’ll need technicians on-site to manage the setup, mapping, and execution during the event. Planning for all these elements ensures there are no surprises.
Facing the Technical Learning Curve
While technology has made projection mapping more accessible, there’s still a technical learning curve. Modern user-friendly software has simplified the process, but it still requires a good grasp of the fundamentals to create a polished final product. The most time-consuming part is often the mapping itself—meticulously aligning the digital content with the physical contours of the surface. This process demands precision and an artistic eye. For complex projects, you’re not just learning software; you’re directing a digital performance. That’s why many of our clients at EMRG Media rely on our team to handle the technical details.
Working with Equipment and Setup Limits
The physical logistics of your setup are just as important as the digital content. The size and brightness of your projector are critical; a large-scale outdoor projection on a building requires a much more powerful (and expensive) projector than an indoor display. For very large surfaces, multiple projectors are often combined using a technique called edge blending to create one massive, seamless image. You also have to consider the environment itself. Where will the projector be placed? How will you manage ambient light that could wash out the image? These practical considerations are key to achieving a crisp, vibrant projection that captivates your audience.
The Future: Projection Mapping and New Tech
Projection mapping is already a showstopper, but the technology is constantly evolving. What feels like science fiction today is quickly becoming the next big thing in live events. As planners and creators, we’re always looking for that next “wow” factor, and the future of projection mapping is full of them. These aren’t just far-off ideas; they are tangible innovations that can make your next corporate event, gala, or brand launch truly unforgettable. By combining projection with other emerging technologies, you can move beyond a passive viewing experience and create a fully immersive world for your guests. The focus is shifting from simply displaying content to creating dynamic environments that respond, interact, and blend the lines between the physical and digital. Let’s look at a few of the most exciting developments on the horizon.
Pairing with Augmented Reality (AR)
Think of projection mapping as setting the stage and augmented reality (AR) as giving each guest a pair of magic glasses. This combination creates a deeply personal and layered experience. Projection mapping, sometimes called spatial augmented reality, transforms a physical surface, while AR adds a digital layer that guests can view through their smartphones or tablets. Imagine projecting a stunning, static cityscape onto a wall at your event. With AR, guests could point their phones at the wall to see animated traffic, flying vehicles, or even their own company logo appearing on a skyscraper. This blend of shared spectacle and individual discovery makes for incredible, shareable moments.
Adding Real-Time Interactivity
The next wave of projection mapping invites your audience to become part of the art. Instead of just watching a pre-made video loop, guests can influence the projections in real time. This creates a living, breathing installation that is unique to your event. By incorporating motion sensors, touch screens, or even social media feeds, you can build interactive experiences that respond directly to your guests’ actions. For example, attendees could walk across a projected field of flowers, leaving a trail of blooming petals behind them, or they could tweet a specific hashtag to see their message appear within the animated display. This level of engagement makes people feel connected to the event and leaves a lasting impression.
Exploring Mobile and Portable Solutions
Projection mapping is no longer confined to massive buildings or large-scale stage productions. The development of smaller, more powerful, and even battery-operated projectors is making this technology more accessible and versatile than ever. These mobile and portable solutions mean you can bring stunning visuals to unexpected places. You could transform a food truck into a dynamic menu board for a pop-up, project intricate patterns onto tables at a gala, or create small, interactive displays throughout a tradeshow booth. This flexibility allows you to integrate projection mapping into any type of event, no matter the size or location, adding a touch of magic to every corner of your venue.
Why Projection Mapping is a Smart Investment for Events
If you’re looking for a way to make a lasting impression, projection mapping is one of the most effective tools in an event planner’s kit. It’s more than just a cool visual effect; it’s a strategic investment that can transform your entire event experience. Instead of relying on static banners or expensive physical set pieces, you can use light and animation to create dynamic, immersive environments that captivate your guests from the moment they arrive.
This technology allows you to tell a story, showcase your brand, and create unforgettable moments that people will be talking about long after the event ends. Whether you’re planning an elegant gala or a high-energy product launch, projection mapping offers a flexible and powerful way to bring your vision to life. It’s a single technology that opens up a world of creative possibilities, making it a smart and forward-thinking choice for any modern event.
One Technology, Many Applications
The true beauty of projection mapping lies in its versatility. It’s not a one-trick pony. The same core technology can be adapted for virtually any type of gathering, from large-scale corporate events to intimate celebrations. Imagine transforming a simple ballroom into a starlit forest for a charity gala or projecting a company’s new logo onto the side of a building for a dramatic reveal. You can create interactive displays for a tradeshow booth or design a breathtaking, animated backdrop for a wedding cake. Projection mapping truly turns ordinary spaces into extraordinary canvases, allowing you to craft immersive brand experiences that deeply connect with your audience.
Reusing Content and Equipment
One of the biggest advantages of investing in projection mapping is its long-term value. Unlike physical props and printed backdrops that are often single-use, the core equipment—projectors, media servers, and software—can be used again and again. The digital content is the variable. You can create new animations and graphics for each event while leveraging your initial hardware investment. This approach allows you to transform everyday physical objects into fresh works of art for every occasion. Over time, this makes projection mapping a more sustainable and cost-effective option than constantly building and discarding physical sets, giving you more creative freedom for your budget.
Deciding Between a DIY or Professional Setup
Getting started with projection mapping is more accessible than ever. User-friendly software has made it possible for those with a creative streak to experiment with their own setups for smaller projects. However, for high-stakes events where a flawless execution is non-negotiable, working with a professional team is essential. An experienced event production company like EMRG Media handles all the technical complexities, from choosing the right projectors and mapping the surfaces to creating custom content that aligns perfectly with your goals. A professional setup ensures everything runs smoothly, so you can focus on your guests instead of worrying about the tech.
Related Articles
- Revolutionizing Event Experiences with Immersive Technology
- 5 Key Hybrid Event Benefits You Can’t Ignore
- Hybrid Events Examples: A Blueprint for Success
- Top Corporate Meeting Planner Companies: Elevate Your Events
Frequently Asked Questions
Is projection mapping only for huge, outdoor events? Not at all. While projecting onto buildings gets a lot of attention, the technology is incredibly scalable. You can use it to create a stunning effect on a smaller scale, like making a wedding cake come alive with animated flowers, turning a stage backdrop into a dynamic scene, or creating an interactive product display at a trade show. The principles are the same whether your canvas is a skyscraper or a sculpture.
How much does a projection mapping project typically cost? The budget can vary widely because it depends entirely on the scale and complexity of your vision. A simple, static projection for an indoor event might be a manageable investment, but a large-scale project with custom animation for a building facade will be significantly more. The main cost drivers are the power of the projector required, the time needed for creating the custom video content, and the on-site technical support to ensure a perfect execution.
What’s the biggest mistake people make when planning a projection mapping project? One of the most common missteps is underestimating the impact of ambient light. For a projection to look sharp and vibrant, the surrounding environment needs to be as dark as possible. Even a small amount of competing light from windows, house lights, or other displays can wash out the image and ruin the effect. A successful project always starts with having complete control over the lighting in your space.
Can I do this myself, or should I hire a professional team? For smaller, more experimental projects, user-friendly software has made it possible to try it yourself. However, for any corporate event, gala, or brand activation where the outcome needs to be flawless, working with a professional team is the way to go. An experienced production company handles everything from choosing the right high-powered equipment to creating the custom content and managing the complex technical setup on-site, so you can focus on your guests.
How long does it take to set up on the day of the event? This is definitely not a plug-and-play feature. The setup time depends on the project’s complexity but always requires careful planning. Technicians need time to position the projector perfectly, run all the necessary cables, and then meticulously align the digital content to the physical surface. This mapping process can take several hours to get just right, so it’s essential to build ample setup time into your event day schedule before any guests arrive.